
In the previous article (https://codevog.com/de/blog/2015-04-06-google-maps-api-for-android) we demonstrated how you can start work with GoogleMaps and do amazing things there. In this article we would like to tell you about Google Directions API.
The Google Directions API is a service that calculates directions between locations using an HTTP request. Service provides different parameters for HTTP request. This API is designed for calculating directions for static addresses, and not designed to use it for real-time user input.
How to use Google Directions API
1) Create API Key for your application in Google Developers Console.
It was described in the previous article. We showed how to create API Key for a project and start working with maps. Our sample project for this tutorial is based on the sample for a preceding tutorial.
2) Note that you should to enable Directions API for your application. Google Maps Android API v2 was enabled in the previous tutorial.

Pic. 1. Enabled Directions API
3) Http request to Directions API.
Request parameters.
You can access the Directions API over HTTP and HTTPS. Request takes the next form:
https://maps.googleapis.com/maps/api/directions/output?parameters
Be aware, that output can be json or xml format.
Request parameters:
Optional parameters:
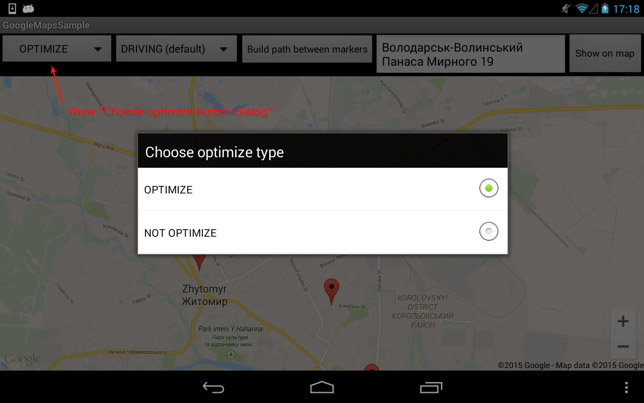
Route optimization.
When you set waypoints, you should describe optimize parameter value.
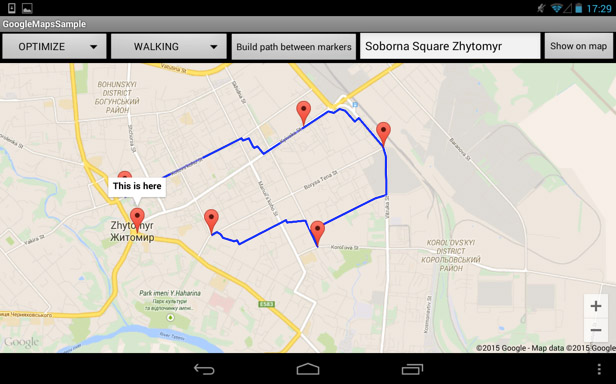
In our sample we used this option. If optimize is true, service will try to optimize the way, otherwise the way will be build point-by-point.
Pic. 2. “Choose Optimize Type” Dialog
After optimize type selection please press “Build path between markers” button.
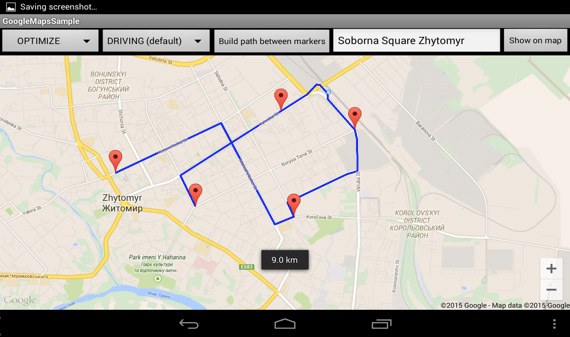
Pic. 3. Path Between Markers When Optimize is True
Pic. 3 shows how the service builds a path when optimize is true. Note that the way distance is 9.0 km.
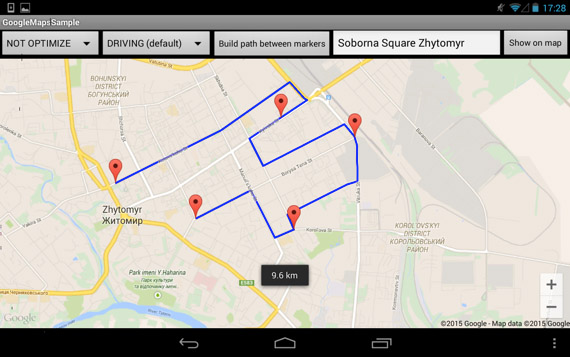
Pic. 4. Path Between Markers When Optimize is False
On Pic. 4 we can see another way and a longer distance (9.6), because we set the optimize parameter as false.
Travel Modes.
Google Directions API provides different travel modes as a request parameter.
There are following travel modes:
For switching a travel mode in the sample application, you should press on the second spinner view. Then choose the necessary travel mode in the appeared dialog (Pic. 5).
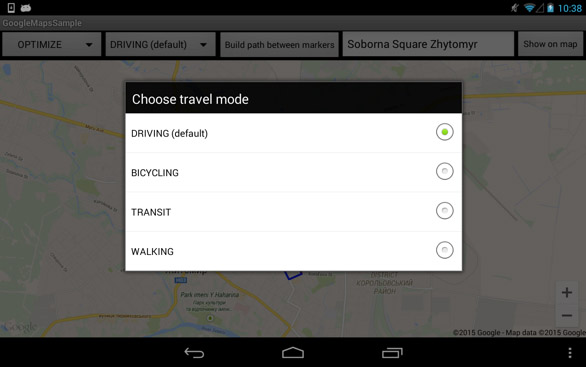
Pic. 5. Choose Travel Mode Dialog
We showed how the application builds path for “driving” mode in the previous screenshot (see Pic. 4). It is noticeable, that in a “walking” mode the application has built another way with 8.0 km distance (Pic. 6).
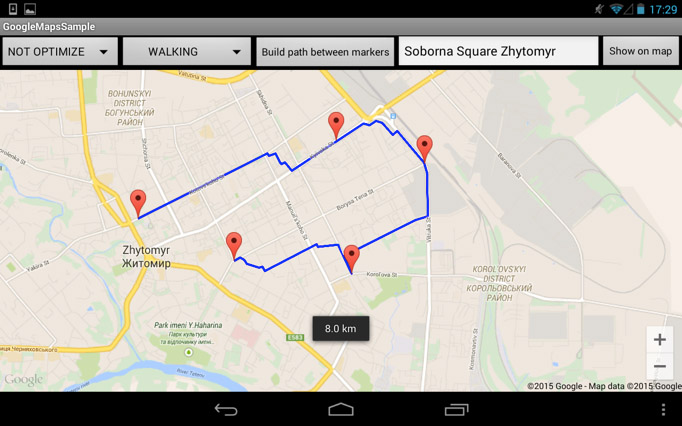
Pic. 6. Path Between Markers When the “Walking” Travel Mode is Used
Unfortunately, “bicycling” and “transit” ways are not available in Ukraine, but it can be available for your location. You may check the map coverage details here: https://developers.google.com/maps/coverage.
We implemented GoogleDirectionApiRequestBuilder class for the request creation. Our builder does not cover all the diversity of requests, but you can extend this functionality according to your needs.
How to find a location by address.
We added another one useful feature to our sample project. In nutshell a user described an address as a string and the application shows this address location on the map as a marker.
Pic.7. Find Location by Address Demonstration
Pic. 7 demonstrates this functionality. User typed the address in EditText above map (Soborna Square Zhytomyr) and pressed “Show on map” button. The application showed the address location with a marker, which signed the following text (“This is here”).
Be aware, that service can return several locations in response if you describe the address not thoroughly enough, because, for example, some street names may coincide in different places.
There is short code snippet for this functionality:
Geocoder geocoder = new Geocoder(getActivity());
List<Address> addressList = geocoder.getFromLocationName(locationName, 5);
double lat = addressList.get(0).getLatitude();
double lng = addressList.get(0).getLongitude();
LatLng latLng = new LatLng(lat, lng);
How to get an address by location.
You can also get to know the address of a selected location. To ensure this, please, press on any marker and the application shows the toast message with address text (Pic. 8).

Pic 8. Marker Location Demonstration
The following code snippet shows how this works:
private String getCompleteAddressString(double LATITUDE, double LONGITUDE) {
        String strAdd = "";
        Geocoder geocoder = new Geocoder(getActivity(), Locale.getDefault());
        try {
            List<Address> addresses = geocoder.getFromLocation(LATITUDE, LONGITUDE, 1);
            if (addresses != null) {
                Address returnedAddress = addresses.get(0);
                StringBuilder strReturnedAddress = new StringBuilder("");

                for (int i = 0; i < returnedAddress.getMaxAddressLineIndex(); i++) {
                    strReturnedAddress.append(returnedAddress.getAddressLine(i)).append("\n");
                }
                strAdd = strReturnedAddress.toString();
                Log.w("My Current location address", "" + strReturnedAddress.toString());
            } else {
                Log.w("My Current location address", "No Address returned!");
            }
        } catch (Exception e) {
            e.printStackTrace();
            Log.w("My Current location address", "Can not get Address!");
        }
        return strAdd;
    }
So, we described several very helpful capabilities of Google Directions API, but this service is much broader. You can download the sample project here (link). For quality theory basements learning we recommend to use Google documentation (https://developers.google.com/maps/documentation/directions/#Limits)
Thanks!
Kategorien
Schlagworte
Favoriteneinträge
Getting an e-Commerce website online might sound like a huge undertaking,...
WebView displays web pages. But we are interested not only in web-content...
Google Maps is a very famous and helpful service, which firmly entrenched...
RSpec is an integral part of Test Drive Development (TDD) and its main id...
When developing a web application that extensively works with user input ...
Field configuration defines behavior of all standart (system) fields and ...
As you might have already heard, the latest stuff for upgrading rails was...